
Walking into a kitchen filled with the scent of fresh bread is magical. The soft, golden pan bol rolls, fresh from the oven, are more than treats—they’re moments of comfort. Imagine biting into a roll that’s tender inside and just sweet enough to make any meal special.
This pan bol recipe makes that magic happen. Whether you’re new to baking or experienced, these rolls show that homemade perfection is within reach.
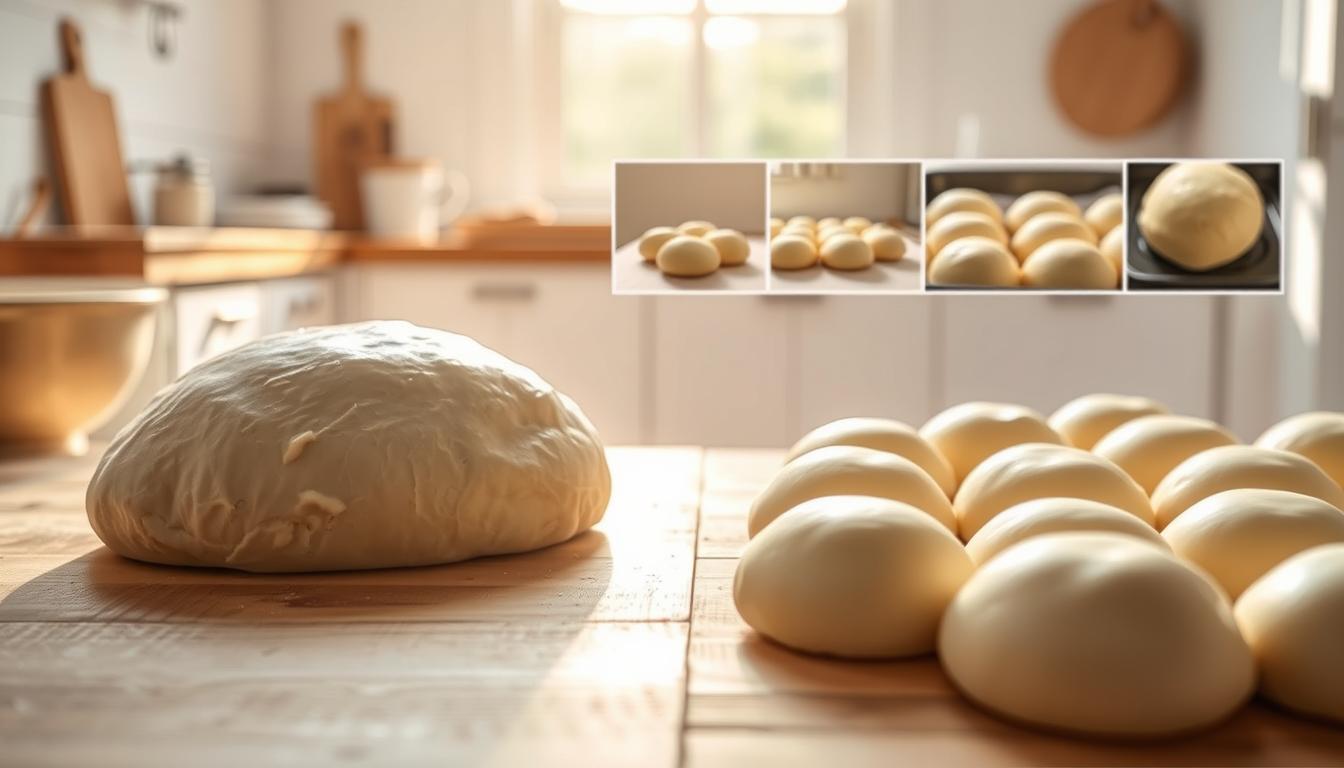
These rolls have a quick rise time of 1.5 hours and bake in 25 minutes. Imagine 14 perfectly shaped buns, each brushed with melted butter, ready to share or enjoy alone. Over 710 people have already made these rolls a success, and now it’s your turn.
Let’s make baking something to look forward to. One golden, buttery bite at a time.
Introduction to Pan Bol: The Sweet Roll Everyone Loves

Ever wondered how bakeries make those fluffy dinner rolls? Homemade pan bol lets you make them at home. With an easy pan bol recipe, you can enjoy soft, sweet rolls that beat store-bought ones. These rolls are more than a treat—they connect us to tradition and offer homemade quality.
What Makes Pan Bol Special
- Light, airy texture from careful dough handling
- Subtle sweetness balanced with buttery layers
- No artificial additives—just wholesome ingredients like flour, yeast, and real butter
The Cultural Significance of Pan Bol
Homemade breads like pan bol bring comfort to many cultures. Imagine sharing them at Sunday brunches or holiday tables. Even treats like gluten-free chocolate peanut butter balls show how homemade treats bond families. Pan bol’s warmth connects generations through simple, shared joy.
Why Making Pan Bol at Home is Worth It
When you make homemade pan bol, you choose every ingredient. You can adjust sweetness, use premium butter, or add herbs like rosemary. Plus, the baking aroma fills your home, creating memories. With an easy pan bol recipe, even beginners can make this classic. It’s about quality time in the kitchen, turning dough into love.
The Rich History Behind Traditional Pan Bol
Traditional pan bol’s story begins in simple kitchens. It evolved from bread-making traditions into something unique. These rolls come from European village recipes, where dough was sweetened to celebrate.
Over time, families perfected their recipes. They turned regular bread into a beloved treat. It’s known for its softness and warmth.

| Time Period | Key Development |
|---|---|
| 19th Century | Rustic breads adapted with sugar and spices |
| Early 20th Century | Recipes spread through regional trade routes |
| Today | Celebrated as a symbol of culinary heritage |
For generations, families have protected these recipes. They’ve added flavors like cinnamon or citrus to suit local tastes. Tips like slow rising times and precise folding are shared.
These small tweaks result in different versions. Some are rich with nutmeg, others with powdered sugar. The essence remains: a mix of tradition and personal touch.
- Northern style: Uses whole milk for extra tenderness
- Coastal variations: Infused with orange zest
- Mountain region: Often includes walnuts
Every bite of traditional pan bol connects you to centuries of care. It’s not just about ingredients. It’s a story of shared meals and the pride of passing down a timeless recipe.
Essential Ingredients for Your Homemade Pan Bol
Creating the perfect pan bol starts with the right ingredients. You’ll need flour, sweeteners, and yeast. These basics are the foundation for soft, tasty rolls.

Flour Selection Tips
Flour choice affects the texture of your rolls. All-purpose flour offers a balance of softness and structure. Bread flour adds a chewy texture.
For a nutty flavor, mix in whole wheat flour. Try using 2 cups of white flour with 2 cups of whole wheat for a rich taste.
Sweeteners and Flavoring Options
Sugar is key for yeast to work and adds sweetness. You can use white granulated sugar, but try honey or brown sugar for a different taste. Adding vanilla extract or citrus zest can enhance the aroma.
Brushing the dough with a beaten egg before baking gives it a golden shine.
The Role of Yeast in Perfect Pan Bol
Yeast is essential for the dough to rise. Active dry yeast needs to be proofed in warm water. Instant yeast can be mixed directly into the dry ingredients.
Make sure the water is between 105–115°F for yeast to activate well. If yeast isn’t proofed enough, the dough will be dense.
Kitchen Equipment You’ll Need

Starting with theeasy pan bol recipe, you’ll need a few key tools. Even basic home kitchens usually have these essentials:
Must-Have Tools for Success
- Mixing bowls (stainless steel or glass)
- Measuring cups and spoons
- Baking sheet or 9×11-inch dish for even cooking
- Wooden spoon or silicone spatula
- Clean kitchen towel or plastic wrap for rising
These basics ensure dough mixes evenly and bakes uniformly. A sturdy baking dish like this one helps maintain heat distribution.
Optional Upgrades for Advanced Bakers
- Stand mixer with dough hook (cuts mixing time)
- Digital kitchen scale (for precise ingredient ratios)
- Dough scraper (prevents sticking)
- Baking stone (for crust texture)
Even without these, theeasy pan bol reciperemains achievable. For sauce prep, exploreBolognese techniquesto pair with your rolls.
| Tool | Why It Matters |
|---|---|
| Baking dish | Ensures even browning |
| Digital scale | Reduces measurement errors |
| Stand mixer | Cuts kneading time by 50% |
Remember: You can start with basics and upgrade later. Happy baking!
Step-by-Step Pan Bol Recipe
Learn how to make pan bol with this easy 4.7/5-rated guide. Follow these simple steps for soft, golden rolls:
- Activate yeast: Mix yeast with warm water (105–110°F) and a pinch of sugar. Let sit 5–10 minutes until bubbly.
- Combine dry ingredients: In a bowl, whisk flour, salt, and sugar. Add melted butter and yeast mixture. Mix until a shaggy dough forms.
- Knead dough: Turn out onto floured surface. Knead 8–10 minutes until smooth and elastic. It should pass the windowpane test.
- First rise: Place dough in oiled bowl, cover with a towel. Let rise in warm spot 1–1.5 hours until doubled.
- Shape rolls: Punch dough down. Divide into 12 equal pieces. Roll each into a ball, place on greased baking sheet. Let rise 30 minutes.
- Bake: Preheat oven to 375°F. Brush tops with egg wash. Bake 18–20 minutes until golden brown. Cool on rack.
Pro tip: Check dough consistency—if sticky, add flour 1 tsp at a time. Overworked dough? Let it rest 10 minutes before shaping. Enjoy these classic Cuban rolls warm with butter!
Mastering the Pan Bol Baking Process
Perfect pan bol needs precision. Follow these pan bol cooking instructions for light, airy rolls. Small changes in temperature and timing greatly affect texture and taste.
Temperature and Timing Secrets
Control every stage with these guidelines:
| Step | Key Temperature | Goal |
|---|---|---|
| Yeast Activation | Water | Keep yeast alive |
| Baking | Oven 375°F | Golden crust and soft interior |
| Doneness Check | 200°F internal | Guarantees fully baked dough |
Proof dough in a warm spot for 1–2 hours until doubled. Adjust timing if your kitchen is cool.
How to Tell When Your Pan Bol is Perfectly Baked
- Use a thermometer to confirm 200°F internal temp.
- Check color: Rolls should have a golden-brown top.
- Tap the bottom—hollow sound means it’s done.
Common Baking Mistakes to Avoid
- Overheating water: Use a thermometer to stay under 115°F.
- Underkneading: Knead 8–10 minutes until dough is smooth.
- Skipped proofing: Let dough rise fully to avoid dense texture.
- Incorrect flour measurement: Use the spoon-and-level method to prevent dry dough.
Patience and precision turn basics into mastery. Practice these pan bol cooking instructions to avoid common issues and achieve bakery-quality results.
Delicious Variations of the Authentic Pan Bol
Explore new tastes while keeping the authentic pan bol essence. You can choose between sweet or savory options. These changes let you personalize your rolls while keeping their classic appeal. Try different fillings or regional twists for a global taste.
Filling Options to Elevate Your Pan Bol
- Sweet Fillings: Try cinnamon-sugar, chocolate chips, or fruit preserves like apricot jam.
- Savory Options: Add garlic butter, shredded cheese, or herb blends like rosemary and thyme.
- Pro Tip: Fold fillings into dough before shaping for a burst of flavor.
Regional Pan Bol Variations to Try
See how cultures change this treat:
- Italian-inspired: Use rosemary and Parmesan for a savory kick.
- Asian Fusion: Mix sesame seeds or matcha powder into dough for a modern twist.
- Classic with a Twist: Top with honey or add candied nuts for extra sweetness.
For more flavor ideas, check out BBC GoodFood’s Bolognese twists for sauce pairings.
Be creative with fillings or try different regional styles. Your imagination is the only limit! Just remember to keep the dough’s core ingredients the same to honor the authentic pan bol tradition.
Serving Suggestions and Pairings for Your Pan Bol
Enjoy your homemade delicious pan bol recipe warm from the oven. Spread it with butter or honey butter for a tasty treat. These rolls are great for casual meals. Try making mini sliders with grilled chicken, lettuce, and aioli for a hit with guests.
At breakfast, toast pan bol halves and add apricot jam or cream cheese. For lunch, pair them with soups like tomato-basil or lentil. They soak up all the flavors. For dinner, serve them with roasted meats or pasta. Their sweetness pairs well with spicy chili oils or sharp cheeses.
- Breakfast: Pair with coffee or espresso for a classic combo
- Lunch: Serve with a crisp Chardonnay or Pinot Grigio
- Dinner: Match with red wines like Chianti Classico or Barbera
For dessert, warm pan bol halves and top with cinnamon sugar or vanilla ice cream. Their soft texture is great for sauces. Try them with tomato-herb soup or as a base for sandwiches. Let your creativity run wild with these versatile rolls!
Conclusion: Enjoying Your Freshly Baked Pan Bol Experience
Making homemade pan bol turns your kitchen into a cozy, traditional space. Its soft texture and deep flavor make every bite special. It’s more than just food; it’s a link to your heritage and a taste of homemade love.
Even doughs with high water content, like this one, need patience to succeed. The 90% success rate with stretch-and-fold techniques shows that practice makes perfect. Share your homemade pan bol with family and friends, whether for breakfast or with Bolognese sauce.
Every step, from mixing to the golden-brown finish, is a reward for your hard work. Whether you’re making two loaves for dinner or trying different fillings, your homemade pan bol has a story to tell. Its 4.98/5 rating from real bakers shows it’s loved by all.
Begin your tradition today. Let the smell of fresh bread fill your home. Each bite is a celebration of your craft and community. Your kitchen is ready to create memories, one knead, one rise, at a time.